【Vue】天气预报功能
axios的教程使用起来挺简单的,看文档再加上实例就能明白了。文档链接点击这里axios的安装进入到项目文件夹下,运行终端,输入npminstallaxios--save,点击回车。a
axios的教程
使用起来挺简单的,看文档再加上实例就能明白了。
文档链接点击这里
axios的安装
进入到项目文件夹下,运行终端,输入npm install axios –save,点击回车。
axios的使用
放入全局的js文件中
<template>
  <div class="container-fluid">
    <cardtitle :title="cityName" />
    <weathertable :weatherlist="WeatherList" :weathersearch="WeatherSeacrh" />
  </div>
</template>

<script>
  import axios from 'axios' //引入axios
  import CardTitle from './components/CardTitle.vue' //引入组件
  import WeatherTable from './components/WeatherTable.vue'

  export default {
    data() {
      return {
        //通过API获取到的天气数据存放在这个数组里面
        WeatherList: [],
        cityName:'广州'//默认显示广州的天气
      }
    },
    components: {
      cardtitle: CardTitle,//将组件映射为标签
      weathertable: WeatherTable
    },
    mounted() {    //生命周期钩子
        this.WeatherSearch('广州');
    },
    methods: {
      WeatherSeacrh(cityName) {
        const url =
          `https://api.apishop.net/common/weather/get15DaysWeatherByArea?apiKey=您自己的apikey&area=${cityName}`;
        //使用axios发送ajax请求获取数据
        axios.get(url).then(response => {
            //请求成功
          }).catch(error => {
              //请求失败
        });//axios-end
      },//WeatherSearch-end
    },//methods-end
 }
</script>
<style>
</style>
先把App.vue组件的基本框架写好。
首先是引入了CardTitle组件和WeatherTable组件,并且将它们映射为标签 <cardtitle /> 和 <weathertable />
然后呢,因为需求中说默认显示广州地区的天气,所以我们用到了生命周期中的mounted钩子,在其中执行我们的查询天气的方法WeatherSearch。
再然后呢,就是 WeatherSearch 方法了,我们在这里面使用了axios发送ajax请求获取数据,里面获取天气的api来自 API Shop,可以自己注册个账号获取自己的apikey,然后替换掉url里面的就行了。
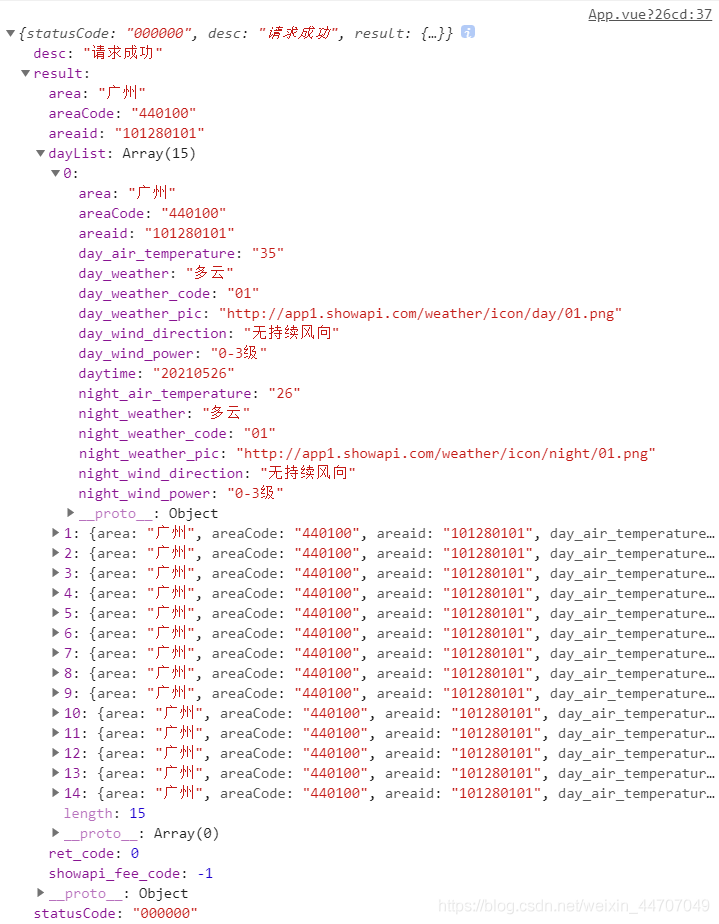
通过查看控制台,我们可以知道返回来的数据格式是这样的:
也就是说,在WeatherSearch方法中,我们要用获取到的数据中的dayList替换掉data中的WeatherList,数据中的area替换掉data中的cityName。现在完善一下 WeatherSearch 方法:
WeatherSeacrh(cityName) {
  const url = `https://api.apishop.net/common/weather/get15DaysWeatherByArea?apiKey=您的apikey&area=${cityName}`;
  //使用axios发送ajax请求获取数据
  axios.get(url).then(
    response => {
      //请求成功
      const dayList = response.data.result.dayList;//天气数据
      const area = response.data.result.area;//城市名称
      console.log(dayList,area);
      //先将WeatherList数组清空
      this.WeatherList.length = 0 ;
      //将dayList的元素遍历一遍送进WeatherList里面
      dayList.forEach((ele,index,arr) => {
        this.WeatherList.splice(index,1,ele);
      });
      //赋值城市名称
      this.cityName = area;
    }).catch(error => {
    alert('请求失败');
  });
},
这样App.vue组件就完成了,接着到CardTitle组件
<template>
    <div class="row clearfix comment-header">
      <div class="col-md-12 column">
        <div class="card text-center">
          <div class="card-body">
            <h1 class="card-title comment-title">{{title}}--天气查询</h1>
          </div>
        </div>
      </div>
    </div>
</template>

<script>
  export default {
    props:{
      title: String,
    }
  }
</script>

<style>
</style>
这个组件比较简单,就是改变标题中的城市的名称。
WeatherTable.vue
<template>
  <div class="row clearfix">
    <div class="col-md-12 column">
      <div class="card">
        <div class="card-header text-end">
          <input type="search" placeholder="请输入城市名称" v-model="cityname"/>
          <button type="button" class="btn btn-primary" @click="Search">查询</button>
        </div>
        <div class="card-body">
          <table class="table table-hover">
            <thead>
              <tr>
                <th scope="col">日期</th>
                <th scope="col">日间温度</th>
                <th scope="col">晚间温度</th>
                <th scope="col">日间天气</th>
                <th scope="col">晚间天气</th>
                <th scope="col">风向</th>
                <th scope="col">风力</th>
              </tr>
            </thead>
            <tbody>
              <tr v-for="(ele,i) in weatherlist">
                <td>{{ele.daytime}}</td>
                <td>{{ele.day_air_temperature}}℃</td>
                <td>{{ele.night_air_temperature}}℃</td>
                <td>{{ele.day_weather}}</td>
                <td>{{ele.night_weather}}</td>
                <td>{{ele.day_wind_direction}}</td>
                <td>{{ele.day_wind_power}}</td>
              </tr>
            </tbody>
          </table>
        </div>
      </div>
    </div>
  </div>
</template>

<script>
  export default {
    data() {
      return {
        cityname:''
      }
    },
    props: {
      weatherlist: Array,
      weathersearch: Function,
    },
    methods:{
      Search(){
        const {weathersearch} = this;
        weathersearch(this.cityname);
      }
    }
  }
</script>

<style>
</style>
WeatherTable组件有两个自定属性,分别是weatherlist和weathersearch。
weatherlist接收的是用于渲染页面的天气数据的数组。
weathersearch接收的则是用于进行搜索的天气的方法。
到这里,这个实例就已经完成了。
相关文章
发表评论
评论列表
- 这篇文章还没有收到评论,赶紧来抢沙发吧~


